
Sequence Over Strength™ Pitching Instruction
The Beginning of Your Sequence Over Strength™ Pitching Instruction
Every missed target, inconsistent pitch, or loss of velocity begins with a movement breakdown.
- Over many, many years, Coach Skip identified your breakdowns and solved them in the Sequence Over Strength™ Pitching Instruction.
- You’ll produce greater velocity, better command, more consistent results, and injury resistance with less effort.
Instead of guessing what’s wrong or trying random drills, the personalized instruction you receive will promote your motion.
Starting Position → Glove Hand → Hips → Front Leg → Throwing Arm
Let’s Get Started
Step 1: Your Starting Position
A balanced starting position allows your body to move in sequence.
When your body moves in sequence, command improves, velocity becomes effortless, and your delivery becomes repeatable.
Build Your Starting Position
-
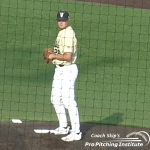
- Position your feet approximately one baseball width apart.
- Keep your knees outside your feet.
- Have your knees form a diamond.
- Keep the soles of both feet flat on the ground.
- This is essential for balance and for letting your lower body lead the delivery.
- Position your glove hand palm directly beneath your chin.
You maintain your back knee in this position until your glove hand pulls your body forward.
Hold this position for 1001… 1002… 1003, then step back by moving your front leg behind your back leg and allow your back leg to naturally follow.
Repeat until this position feels natural and effortless.
Step 2: Your Front Leg Lift
Your front leg lift builds on the balanced starting position you’ve already mastered.
A balanced front leg lift keeps your body in sequence. When your front leg lifts correctly, your back thigh naturally comes forward first, then the rest of the leg follows. This allows your lower body to lead the delivery, creating better command, effortless velocity, and repeatable consistency.
Your front leg lift continues to prepare your body to move in sequence.
-
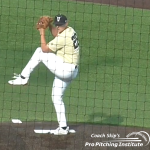
- Keep your front knee even with your front shoulder, your front heel even with your back toes, and your front toes pointing directly toward the plate.
-
-
- Lift your front leg as high as you want as long as you keep your hips level.
-
-
- From your front-leg lift, make sure your pelvis points to the target.
- Keep your front knee even with your front shoulder, your front heel even with your back toes, and your front toes pointing directly toward the plate.
Hold this position for 1001… 1002… 1003, then step back by moving your front leg behind your back leg and allow your back leg to naturally follow.
Repeat until this position feels natural and effortless.
Step 3: Your Separation
Your separation builds on the balanced starting position and front leg lift you’ve already mastered.
Balanced separation keeps your body connected from the ground up.
Your separation is the last preparation before you complete your sequence.

Glove Hand Movement
-
- Face your glove-hand palm toward your target.
- Move your glove hand palm halfway up your front knee.
- Keep your glove hand inside your glove elbow.
Throwing Hand Movement
-
- Your throwing hand removes the baseball from your glove and stays inside your throwing elbow.
- Point your throwing hand palm toward second base.
- Your throwing hand ALWAYS stays on the corner-base side of your body.
MOVE YOUR GLOVE HAND TO MID-THIGH AND STOP.
Hold this position for 1001… 1002… 1003, then step back by moving your front leg behind your back leg and allow your back leg to naturally follow.
Repeat until this position feels natural and effortless.
Everything in your delivery begins WITH YOUR GLOVE HAND IN THIS MID-THIGH POSITION.
- Stop at “Step 3”, send me a video of your set-up before moving to “Step 4”.
Step 4: Your Final Step – Your Throwing Action
Your throwing action is the result of mastering your starting position, front leg lift, and separation.
A balanced throwing action isn’t created by your arm. Your entire body produces it through a coordinated sequence. When your lower body leads correctly, your back thigh comes forward first, then the rest of the leg follows. Your throwing arm simply delivers the baseball.
This is where greater velocity, better command, more consistent results, and injury resistance come together.
Your explosive throwing action completes your sequence.
Perform this drill very slowly at first. Speed comes only after the movement is repeatable. Without moving the rest of your body, especially your front leg, move your glove-hand palm to mid-thigh.
-
- Rotate your glove hand so your arm joint goes from up to down.
- Move your glove-hand palm to your hip, bringing your glove-hand elbow behind your body.
- Finish with your glove-hand palm facing the target and below your glove-hand elbow.
- EXTREMELY IMPORTANT … Your front leg moves ONLY after your glove-hand elbow goes down.
- Deliver the ball to your target with your back leg moving up and forward.
(In your present motion, your front leg hits, then you throw. By involving your glove hand before your front leg hits the ground, your entire body fires the baseball, not just your throwing arm.)
- Rotate your glove hand so your arm joint goes from up to down.
The glove hand doesn’t simply move across your body; it begins the sequence.
-
- This movement prepares the hips to lead, allows the lower body to create direction, and sets up the throwing arm to deliver the baseball.
- When done properly, your back thigh leads your motion.
Master the movement slowly, then gradually increase the speed while maintaining the same sequence.
Anytime you feel you’ve mastered a position or are struggling with a position, SEND YOUR VIDEO.
Sequence Over Strength™ … The body throws the baseball one movement at a time.
Thank you for your support.
I truly appreciate your trust and the opportunity to help you become a more consistent, confident pitcher.