
Remote Pitching Instruction
Every Motion Begins With Your Starting Position
Your first movement puts everything that follows either IN SEQUENCE or drastically OUT OF SEQUENCE.
YOU WANT YOUR GLOVE HAND TO PROMPT YOUR STRIDE.
- Your glove hand comes across your body.
- Your glove hand movement prompts your lower body.
- Your front foot lands.
- Your throwing hand delivers the baseball.
Glove Hand → Hips → Stride → Throwing Hand
The goal is a connected motion that produces greater velocity, better command, and more consistent results without asking your throwing arm to create the entire pitch.
Your Starting Position
Step 1 of 4: Your Starting Position
A balanced starting position gives your body the foundation to move in sequence.
Instead of immediately asking your throwing arm to compensate, you’re building the delivery from the ground up.
Build Your Starting Position
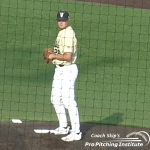
- Position your feet approximately one baseball width apart.
- Form a diamond with your knees.
- Keep the soles of both feet flat on the ground.
- Keep your back knee in this position until your glove hand pulls your body forward.
- Position your glove-hand palm directly beneath your chin.
This starting position establishes the balance you need to allow your glove hand and lower body to lead the delivery.
Hold It
- Hold the position for 1001… 1002… 1003, then step back by moving your front leg behind your back leg and allowing your back leg to naturally follow.
- Reset. Repeat.
- Continue until the starting position feels natural, balanced, and repeatable.
When your Starting Position feels natural, contact me for verification.
Send your motion to Coach Skip.
Build the Rest of Your Motion FOR $60
For $60, you’ll receive detailed instruction for the movements that build your entire Sequence Over Strength™ pitching motion.
- We don’t try to fix everything at once.
- Once you master your starting position, we find the first breakdown and correct it.
Here’s How Remote Instruction Works
1. Learn ONE movement.
I’ll give you the detailed instruction for the movement you’re working on.
2. Send me your video.
I’ll review your motion and compare it with the instruction.
3. Make ONE correction.
If something needs attention, I’ll tell you what I’d correct first.
4. Show me the correction.
Once your video shows you’re performing that part of the instruction correctly, you’ll move on to the next instruction.
5. Keep building.
We’ll progress through your motion one movement at a time:
Starting Position → Front Leg Lift → Separation → Throwing Action → Follow-Through
Each movement builds upon the movement before it.
Discover a Better Throwing Hand Path Today …
⚾ Explosive Throwing Action | ⚾In-Person Instruction in South Jersey | ⚾ The “Sequence Over Strength™” Book